MegaSquirt PNP Gen2 Documentation
Model/Vehicle specific installation guide for model MSPNP2-P8791 for a 1987-1998 Porsche 944S and 1989-1991 Porsche 944S2.
Please read all documentation before installing your MegaSquirtPNP EMS and verify that you've followed all steps before starting your engine for the first time.
Physical Installation
All you'll need for a successful installation are some basic hand tools.
For a thorough and professional installation, you will need the following items:
-
Phillips head screw driver
-
Flat head screw driver
-
Drill with 3/16" drill bit
-
Zip ties
-
Timing light
-
Laptop with TunerStudio installed
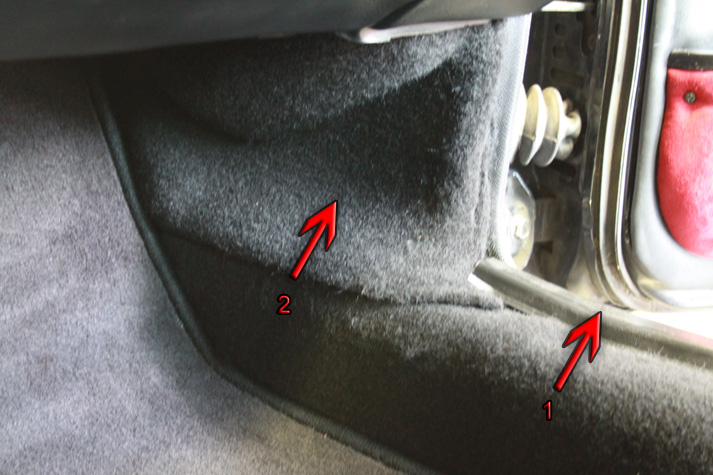
The stock ECU is located in the passenger's side footwell, just behind a panel beneath the carpet. To begin, gently 1) pull up the plastic door sill. 2) remove the kick panel carpet on the side of the footwell. 3) pull the carpet back from the firewall towards the seat.
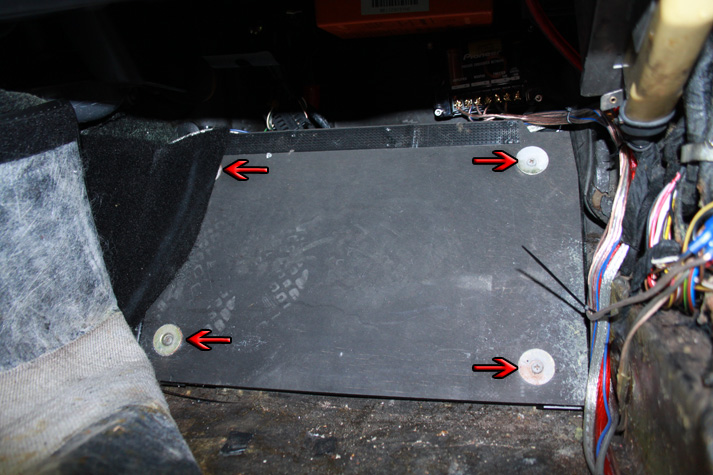
This exposes a wooden plate secured by 4 screws. Remove the 4 screws and plate and the ECU will be exposed.
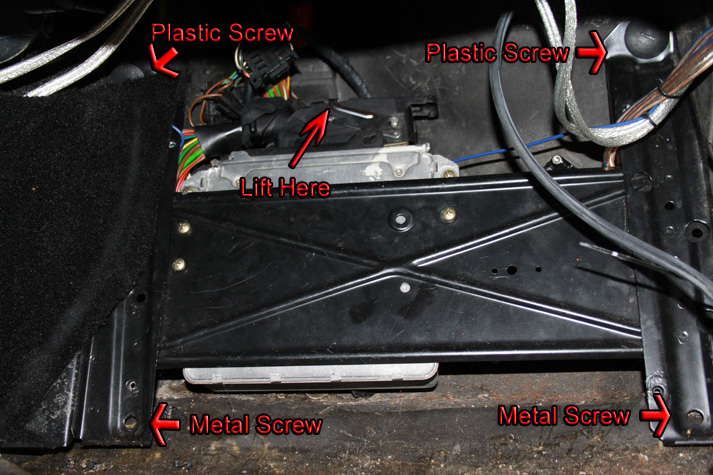
With the plate removed, disconnect the ECU wiring harness by lifting the silver handle to a 12 o'clock position. The harness and connector can then be lifted out of the ECU and pushed aside. Remove the ECU and bracket by removing the 2 plastic and two metal screws at the corners of the bracket.
The original ECU is secured to the bracket by 3 Philips head screws. Remove these screws and the ECU and strap bracket will come free. Discard the stock ECU and one of the mounting screws.
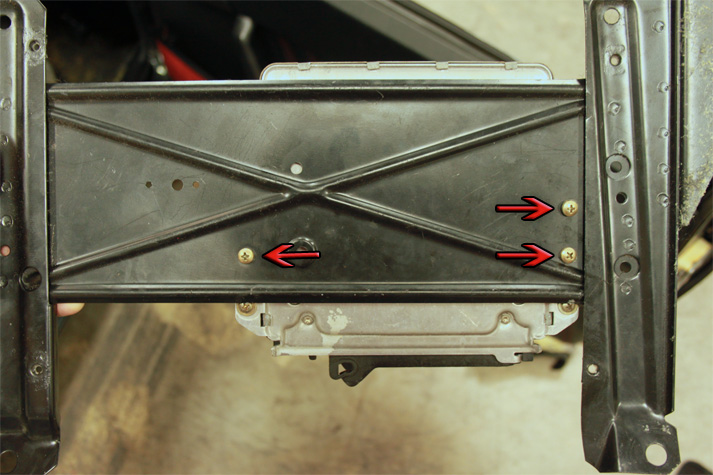
Lay the MSPNP in place of the original ECU and align the edges as shown below. Secure the MSPNP in place using the original strap bracket and two of the three original screws. Mark the two MSPNP mounting hole locations that overlap the bracket edge. Loosen the bracket screws that secure the strap bracket, remove the MSPNP, and drill new holes in the original bracket using a 3/16" drill bit.

Reattach the MSPNP to the bracket, secure using the two nuts and bolts provided, and tighten the two original screws.
Before you install the assembled MSPNP and bracket into your car, you must first route a vacuum line from a vacuum source to where the MSPNP will be located. We chose to route our vacuum line from the engine bay through the battery box, then into the cabin, but the overall route is up to you.
Using the provided vacuum tee and a short piece vacuum hose, connect the tee inline with the check valve near the fuel pressure regulator. After the tee is installed, connect one end of the vacuum line for the MSPNP here, route it neatly through the engine bay, and secure it with zip ties to prevent movement and entanglement. NOTE: Avoid pulling the zip ties so tight as to collapse the vacuum hose. The zip ties should only be snug at best.
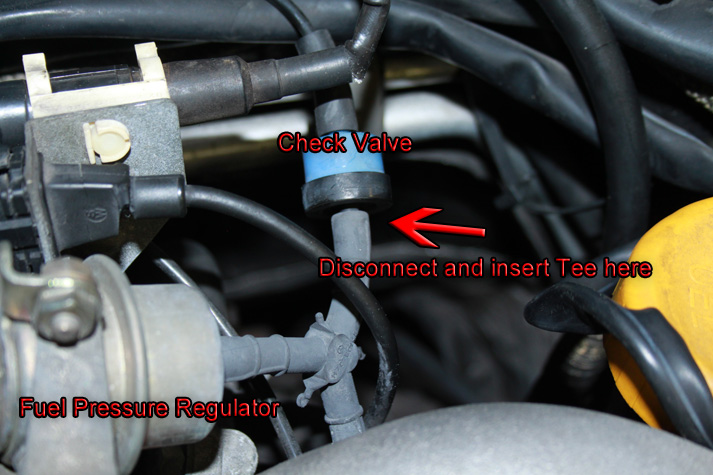
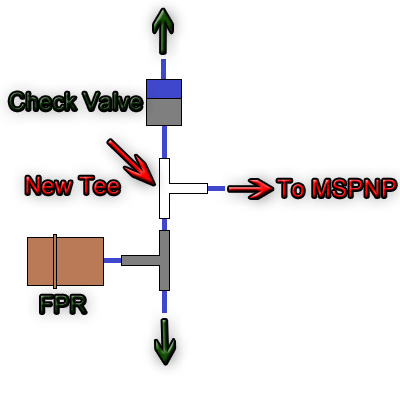
Once the vacuum line has been routed to the footwell, trim as necessary and connect it to the vacuum nipple on the back of the MSPNP. With the MSPNP attached, set the ECU bracket in place where it was originally located, connect the ECU harness, and secure the bracket with the two plastic screws and two metal screws. Space is quite limited with the MSPNP installed, so pay very close attention that the vacuum line doesn't become pinch or kinked in any way.

All that remains is to reinstall the wooden plate, carpet, kick panel, and door sill. This process is the reverse of the removal.
Verifying and Adjusting Base Timing
Because the factory ECU is no longer in control of ignition timing, it will be necessary to make checks to ensure the MSPNP is accurately delivering the proper timing. Improper ignition advance can cause engine damage if improperly set or is left unchecked.
The MSPNP will have a base ignition map loaded and ready to use. However, it is necessary to ensure that the timing advance being commanded by the MegaSquirt is in sync with what the engine is actually receiving. These steps will require the use of a timing light and a laptop with a copy of TunerStudio running.
-
Connect a timing light on the cylinder #1 spark plug wire. Use all due caution here, as secondary ignition voltage can be as high as 100,000 volts or more. Also ensure that the timing light's cords can not get tangled in moving engine parts or burned on hot components.
-
Make sure your tuning laptop is connected to your MSPNP and start your vehicle. If you have not already done so, start TunerStudio MS or TunerStudio Lite. Make sure that your laptop connects to the MSPNP and you are online.
-
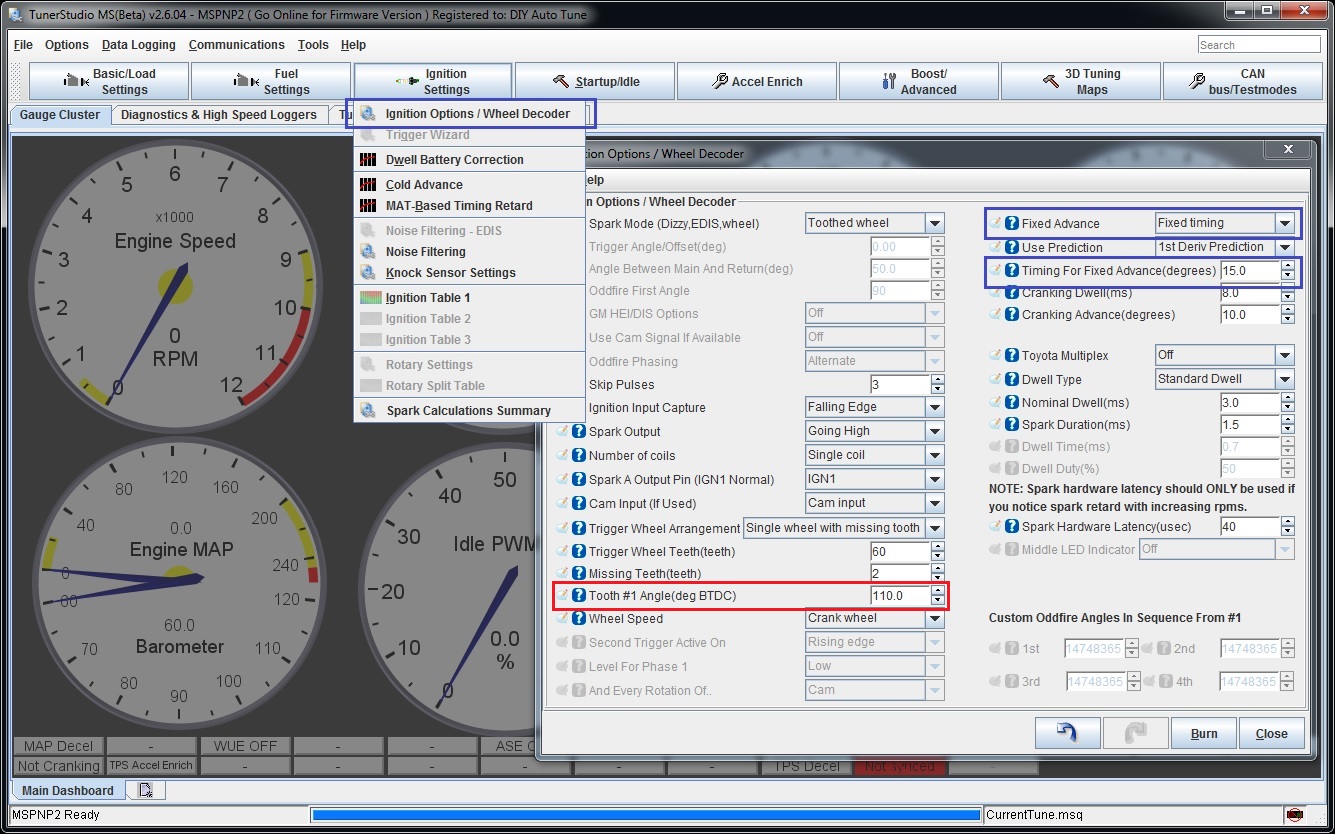
Navigate to Ignition Settings -> Ignition Options/Wheel Decoder. If "Fixed Advance" is set to "Use Table", set it to "Fixed timing" (highlighted with blue rectangles). This will tell the MSPNP to ignore the ignition table and hold a fixed advance angle. Set this value to 15.0 degrees. Use a timing light to confirm that you have 15 degrees of timing at the crank pulley -- If you have more timing, decrease the "Tooth #1 Angle" value (highlighted by a red box). If you have less timing, increase this value. Click "Burn" when you are satisfied with your timing settings.
-
Set "Fixed Advance" back to "Use Table". Burn and close this menu. Cycle power to the MSPNP (turn the car off and back on). The MSPNP is now commanding timing advance based on the ignition table.
Removing the Mass Air Flow Meter
Since the MSPNP calculates engine load using a MAP sensor, the air flow meter is no longer needed. While not necessary, it is recommended to remove the AFM for a small performance increase. At the very least, the air meter should be unplugged and the connector neatly tied away..

